(Note that this is list is relative. An Olin student who has taken Design Nature yet, or somebody who has worked with CAD at all would have a very different list.)
1. – Unit Conversion & Calculation
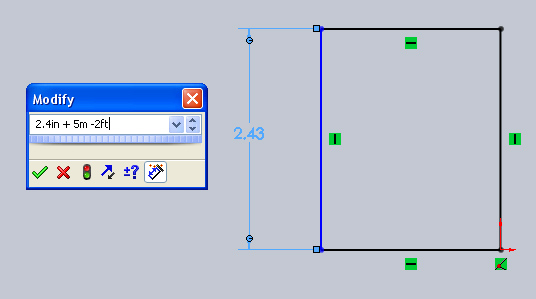
This is an example of a kind of tool (read: tip) that many people know, but if you haven’t stumbled upon it yet you should know about it! Solidworks is generally good at conversion of units for you. If you know you need a certain width in inches plus a couple millimeter tolerance just add them in the dimensioning modify box with units. In many cases excessive use of this means you should be using another dimensioning scheme, which you can change in the options, but we’ll get to that.

2. – Sketch Relations, Equations, Link Values, External Feature References
Another batch of useful dimensioning tools have to do with reducing the number of times you specify a given measurement in a design. Yes, this is sort of like 4 in 1 but who cares…
[](http://blog.marcotuts.com/wp-content/uploads/2009/01/sketch-relations.jpg)Click to expand example of sketch relations available to two lines
2. **Sketch Relations:** First, if you simply want to have sketch entities relate in some way to other sketch entities, CTRL + Select them and the feature manager on the left will give you the available relations. For too long while I was learning to CAD I found myself directly dimensioning the same value within the same sketch for similar measurements. This is hardly ever (comment-correct me if need be) necessary. Additionally, future modification will be strenuous when a single measurement change needs to be applied 30 places within a complicated sketch.
[](http://blog.marcotuts.com/wp-content/uploads/2009/01/equations.jpg)Spot the equations! Only two dimensions were set.
4. **Equations: **For an illustration of just how far you can take Solidworks Equations, check out [this (.DOC) ](http://www.owlnet.rice.edu/~mech403/DemoFiles/SW_demo/Using_Equations_in_SW_1.doc)“how to” written on how to create a block on a ramp system governed by parametric equations inside SW! [Here ](http://www.theswgeek.com/2008/06/16/sum-simple-equations/)is a simpler explanation as well. And now for mine… While you are in the modify dimensioning box shown in the first image above, select the dropdown arrow and then “Add Equation.” This brings up a menu which allows you to enter in sketch/part dimensions with a standard syntax (ex. D1@Sketch1.PartName) as well as basic mathematical formatting. You can make the line (D3@Sketch1) you are dimensioning equal to “D2@Sketch1″ +.2*D1@Sketch1, which makes D3 always equal to D2+ 20% of D1. This is useful when specific relations must relate in a very specific way to others within sketches or across parts. In the end you can have a single dimension effectively drive the others through the use of equations, allowing for simple scaling of parts which must maintain certain geometric patterns if resized. You can also create variables which are also added to the “Equations” folder in the Feature Manager, which can easily be assigned in later sketches. (ex. “D3@Sketch1″ = Number_of_Wheel_Spokes) ([Old article about SW Equations and Link Values.](http://manufacturing.cadalyst.com/manufacturing/article/articleDetail.jsp?id=99702))
5.
[](http://theswgeek.com/wp-content/uploads/2008/05/dimlink101.gif)image from “The Solidworks Geek” article linked below. Note the two linked values with the red symbol showing their linked status.
**Link Values:** I was originally only writing about link values, but I found that explaining the two previous dimensioning tools was vital to understanding the role and niche of the link values dimension tool. Link Values can go across sketches to different features, and it essentially is the same as creating a variable much like the one described in the equations section. Similarly to equations, select the dropdown arrow in the Modify box and select “Link Values” Next, assign a global variable name for this equation, like: Width of Wood. Now you can reuse this linked value in other sketch dimensions and other features, except each individual sketch relations maintains its ability to be edited. This means that you could have the wood width “linked” in 30 different places, and editing 1 of those will go back and edit the other linked values. If you’ve realized you need a slightly thinner sheet of wood for whatever you are building, specify it where you realize it overlaps with your support frame and the rest of them will adjust! More on [Link Values](http://www.theswgeek.com/2008/05/19/linking-dimensions-in-sketches/) from theSWGeek.
6. **External References:** I won’t spend a lot of time on this, but it is useful for you to know this is possible. You can mate/relate a sketch in one part to another part entirely within a subassembly. You need to have at least one of the parts fixed or in some way already placed relative to the other one, but this allows you to create on the fly features while “Editing Part” in a subassembly that doesn’t require you open the part you want to dimension off of in oder to find the width of the hole you are trying to drill across another part. Simply CTRL +select the sketched circle in the existing part you aren’t editing and the circle you just created and set them concentric and equal in the sketch relations list and the second hole will be dimensioned and updated based off the existing hole!
3. – Naming Options
For this last section, I’ll go through the different naming options I enabled for the image below. First of all, each image can be named for your sake. Then D1@Sketch1 turns into Big_Angle@Base_Sketch which hopefully would make more sense in your example.  Select a dimension, and under the “Primary Value” section of the Property Manager you can change the name of the dimension. After you have created an equation you can’t change the name of the dimension through this menu. The next thing I did was enable the dimension name visibility, so you can see them in the graphics area. Just go to Tools–> Options–> Show Dimension Names, that should do it. The last thing I will mention is called “dual dimension.” This way you can specify that you want individual or all dimensions (if you go through the Document dimension options) to display for different units. You can enable this specifically for a dimension by checking the “Dual Dimension” box at the bottom of the property manager when selecting the dimension. This second dimension will be shown with [brackets] around it. Note the Front dimension below had everything I’ve mentioned, plus I enabled the “Show units for dual display dimensions” which shows which dimension is which in the graphics area. To enable this last one: Tools–> Options –> Document Tab –> Dimensions –>check “Show units for dual display dimensions” under Dual Dimensions. Beyond these display options I know very little, but I’m sure for professional applications there is a lot more to those options.
[](http://blog.marcotuts.com/wp-content/uploads/2009/01/dimension_options.jpg)Sample batch of dimensioning display options (Expand for clarity)
Next time: useful presentation tools to polish off your CAD projects.
-Marco


![]() Select a dimension, and under the “Primary Value” section of the Property Manager you can change the name of the dimension. After you have created an equation you can’t change the name of the dimension through this menu. The next thing I did was enable the dimension name visibility, so you can see them in the graphics area. Just go to Tools–> Options–> Show Dimension Names, that should do it. The last thing I will mention is called “dual dimension.” This way you can specify that you want individual or all dimensions (if you go through the Document dimension options) to display for different units. You can enable this specifically for a dimension by checking the “Dual Dimension” box at the bottom of the property manager when selecting the dimension. This second dimension will be shown with [brackets] around it. Note the Front dimension below had everything I’ve mentioned, plus I enabled the “Show units for dual display dimensions” which shows which dimension is which in the graphics area. To enable this last one: Tools–> Options –> Document Tab –> Dimensions –>check “Show units for dual display dimensions” under Dual Dimensions. Beyond these display options I know very little, but I’m sure for professional applications there is a lot more to those options.
Select a dimension, and under the “Primary Value” section of the Property Manager you can change the name of the dimension. After you have created an equation you can’t change the name of the dimension through this menu. The next thing I did was enable the dimension name visibility, so you can see them in the graphics area. Just go to Tools–> Options–> Show Dimension Names, that should do it. The last thing I will mention is called “dual dimension.” This way you can specify that you want individual or all dimensions (if you go through the Document dimension options) to display for different units. You can enable this specifically for a dimension by checking the “Dual Dimension” box at the bottom of the property manager when selecting the dimension. This second dimension will be shown with [brackets] around it. Note the Front dimension below had everything I’ve mentioned, plus I enabled the “Show units for dual display dimensions” which shows which dimension is which in the graphics area. To enable this last one: Tools–> Options –> Document Tab –> Dimensions –>check “Show units for dual display dimensions” under Dual Dimensions. Beyond these display options I know very little, but I’m sure for professional applications there is a lot more to those options.